Key Takeaways
Most SSH security failures come from poor key hygiene, not sophisticated attacks. The core practices: generate Ed25519 keys, protect every private key with a passphrase, keep private keys local-only (never in cloud-synced folders), manage access per user instead of shared team keys, and revoke access the moment someone leaves. The 14 practices in this guide cover the full key lifecycle - from generation to revocation.
- Freelancers managing multiple clients - Use per-client key pairs and local-only credential storage. A compromised laptop should expose one client, not all twelve.
- Startup CTOs with a growing team - Implement per-user key pairs with a clear revocation process. "I'll remove their key later" is how ex-employees retain production access for months.
- Compliance-sensitive teams - Local-only key storage with no cloud sync. Client NDAs often prohibit third-party credential storage, and most SSH tools sync to cloud by default.
| Practice | Manual CLI | With CtrlOps |
|---|---|---|
| Generate Ed25519 key | ssh-keygen -t ed25519 | SSH Setup Wizard, 3 guided steps |
| Copy key to server | ssh-copy-id or manual append | One-click Copy Key button |
| Revoke a key | SSH in, edit authorized_keys manually | Revoke button, instant, no terminal |
| Audit all keys on a server | Manual cat authorized_keys | Visual key registry per server |
| Per-client key organization | Manual ~/.ssh/config editing | Named server cards, per-server management |
| Price | Free (hours of DIY setup time) | $7/month per user, 1 month free trial |
Why SSH Key Management Is the Security Gap Hiding in Plain Sight
You just onboarded a new client. They hand you server credentials over Slack. You drop the IP into your terminal, generate a key on the spot, paste it into authorized_keys, and move on. Six months later the project ends. The key is still there. You never removed it. Neither did the three developers who worked on it before you.
That pattern plays out across thousands of servers every day. For freelance developers juggling 8 to 12 client environments, startup CTOs whose ex-devs still technically have production access, and agency engineers who have never actually looked inside ~/.ssh/ - SSH key management is the security gap hiding in plain sight.
SSH keys are the front door to your entire infrastructure. And most developers manage them the same way they manage browser bookmarks: add when needed, never audit, never clean up. This guide covers real-world SSH key workflows across multi-server setups, CLI-only and GUI-assisted to give you a complete guide, no-fluff reference.
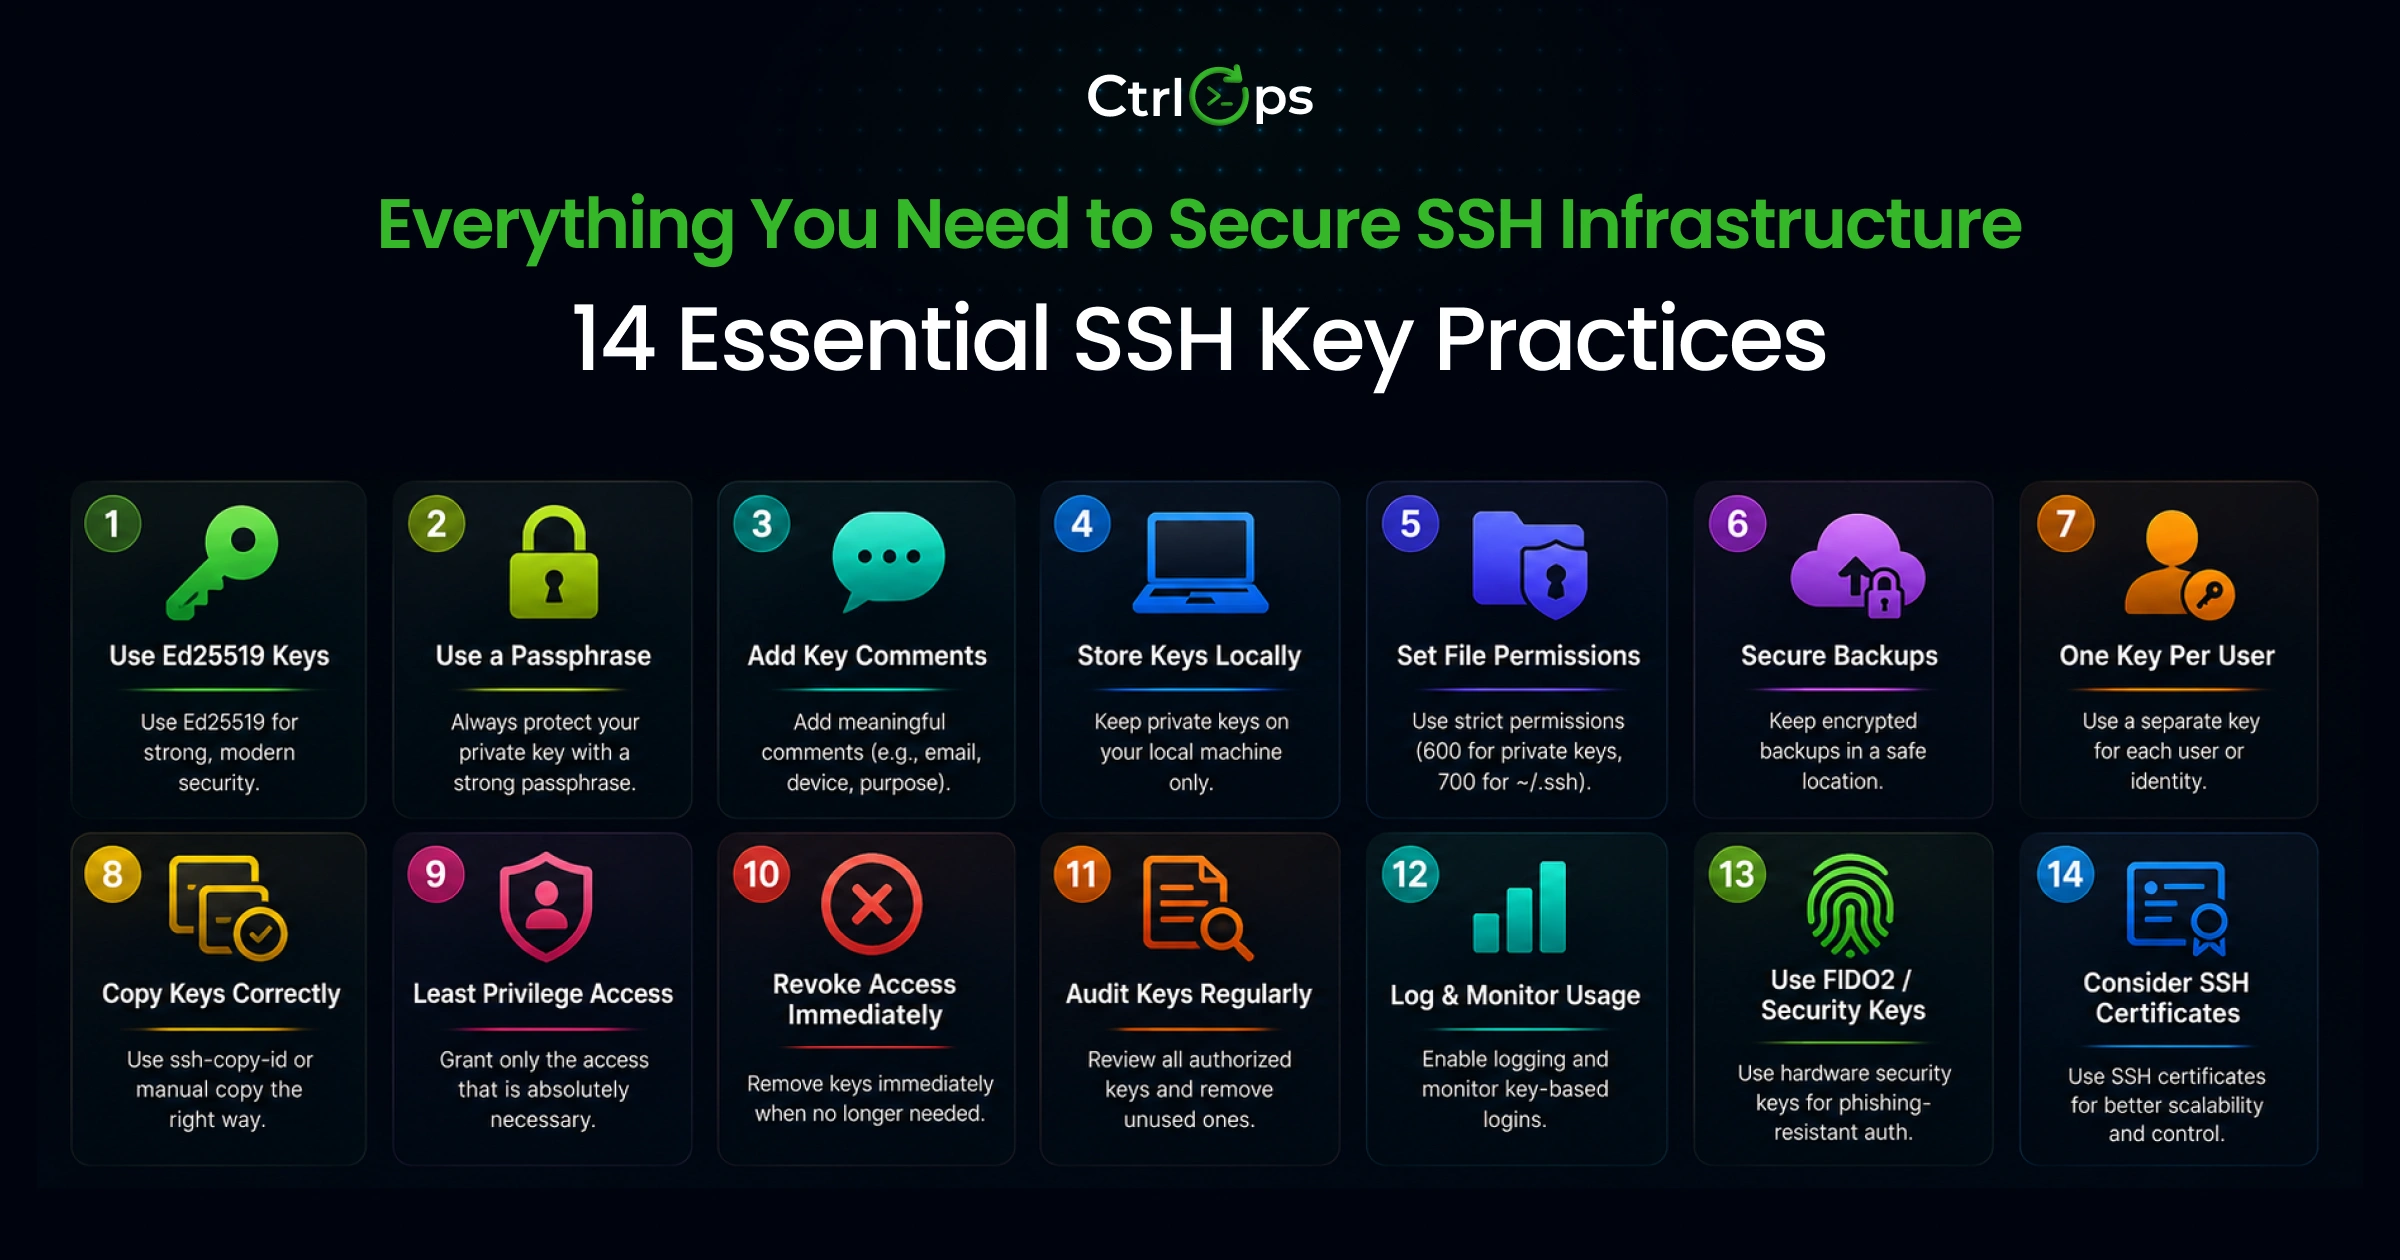
These 14 SSH key management best practices cover the full key lifecycle - from generation to revocation.
The 14 SSH Key Management Best Practices
These 14 practices walk through the full lifecycle of managing SSH keys - generation, key exchange, distribution, passphrase handling, rotation, audit, and deletion - with the exact commands to use at each step. The first twelve apply to every developer or small team managing remote servers. The last two (FIDO2 hardware keys and SSH certificates) cover advanced setups for teams whose needs go beyond standard per-user key files.
Practice 1: Always Use Ed25519 Keys, Not RSA 2048
Ed25519 is the recommended public-key algorithm for new OpenSSH deployments due to its strong security properties, compact key size, fast signature operations, and resistance to several implementation-level attacks. Use it by default for every new key pair. RSA 2048 is still secure today, but it is no longer the best choice for new keys when Ed25519 is available. Reserve RSA for environments that require it for compatibility or policy reasons, and prefer 4096-bit if you must generate a new RSA key.

Why Ed25519 Is Preferred Over RSA For New Deployments:
| Property | Ed25519 | RSA 2048 | RSA 4096 |
|---|---|---|---|
| Key size | 256 bits | 2048 bits | 4096 bits |
| Connection speed | Fastest | Slow | Slowest |
| Security level | Equivalent to RSA 3072 | Acceptable for most current use cases | Acceptable |
| Side-channel resistance | High (by design) | Lower | Lower |
| Support | OpenSSH 6.5 and newer | Universal | Universal |
| Verdict | Use this | Avoid for new keys | Only if Ed25519 unsupported |
Ed25519 connections establish significantly faster than equivalent-security RSA keys - a well-documented property of the underlying Curve25519 algorithm that requires fewer CPU operations per handshake. For modern SSH deployments, Mozilla's OpenSSH Guidelines list Ed25519 as the recommended host key algorithm ahead of all RSA variants. For new SSH key generation, Ed25519 is the recommended choice for its superior security design, excellent performance, and compact key size.
Use RSA 4096 only when compatibility with legacy systems is required.
Generate an Ed25519 key:
ssh-keygen -t ed25519 -C "your-comment-here"Replace your-comment-here with something meaningful - your name, machine name, or client name. More on comments in Practice 6.
Prefer a GUI? You can generate an Ed25519 or RSA key pair with our browser-based tool - it runs entirely client-side, so the private key never leaves your machine.
For a genuinely old server that predates OpenSSH 6.5, fall back to RSA:
ssh-keygen -t rsa -b 4096 -C "your-comment-here"Avoid generating new RSA 2048 keys when you can use Ed25519 instead. If you must use RSA for compatibility or policy reasons, prefer 4096-bit over 2048-bit for new keys.
With CtrlOps SSH Setup Wizard: Click SSH Setup (gear icon, top right of Home) and the wizard automatically recommends Ed25519, walks you through generation, and shows your new key ready to copy. No command memorization needed. See the SSH Setup Wizard documentation for step-by-step details.
See how CtrlOps handles SSH access end-to-end - adding, viewing, and removing keys:
Use Modern SSH Key Exchange Algorithms (Including Post-Quantum)
SSH key exchange (KEX) is not the same as copying a public key to a server. It refers to the cryptographic handshake that happens at the start of every SSH connection - both sides negotiate a session key used to encrypt the entire session. The algorithm used for this handshake is separate from your key type (Ed25519 vs RSA).
This matters in 2026 because weak KEX algorithms are still active on many servers by default, and post-quantum KEX is now the OpenSSH standard.
What "key exchange" means in practice:
| KEX Algorithm | Status | Notes |
|---|---|---|
diffie-hellman-group1-sha1 | ❌ Remove immediately | 1024-bit DH, broken |
diffie-hellman-group14-sha1 | ❌ Remove | SHA-1, flagged by all modern scanners |
curve25519-sha256 | ✅ Keep | Classical baseline, fast and secure |
sntrup761x25519-sha512 | ✅ Keep | Post-quantum hybrid (OpenSSH 9.0+ default) |
mlkem768x25519-sha256 | ✅ Preferred | NIST-standardized PQC hybrid (OpenSSH 10.0+ default) |
The post-quantum context: Since OpenSSH 9.0 (April 2022), the default key exchange has included sntrup761x25519-sha512 - a hybrid combining classical X25519 elliptic-curve Diffie-Hellman with a post-quantum key encapsulation mechanism. OpenSSH 10.0 (April 2025) moved mlkem768x25519-sha256 to the top of the default list. GitHub followed in September 2025, enabling post-quantum KEX for all Git-over-SSH connections. Starting with OpenSSH 10.1, connections that fall back to non-post-quantum KEX will display a warning: "This session may be vulnerable to store now, decrypt later attacks."
If your server runs OpenSSH 9.0 or newer, the post-quantum defaults are already active. The action item is removing the weak algorithms that may still be enabled as fallback options.
Harden your KEX configuration in /etc/ssh/sshd_config:
# Check what KEX your server currently supports
ssh -Q kex

# Add to /etc/ssh/sshd_config to remove weak algorithms
KexAlgorithms mlkem768x25519-sha256,sntrup761x25519-sha512,curve25519-sha256,diffie-hellman-group-exchange-sha256

# Restart SSH daemon
sudo systemctl restart sshd

# Verify the weak algorithms are gone
ssh -oKexAlgorithms=diffie-hellman-group1-sha1 localhost
# Expected: "no matching key exchange method found"
Remove diffie-hellman-group1-sha1 and diffie-hellman-group14-sha1 entirely. These use SHA-1, are flagged by every modern vulnerability scanner, and have no place in a 2026 server configuration. For authoritative KEX recommendations, see Mozilla's OpenSSH Guidelines and openssh.org/pq.html.
diffie-hellman-group1-sha1 as a fallback KEX is only half-hardened. Check both. OpenSSH 9.0+ has post-quantum KEX enabled by default - but weak legacy algorithms may still be listed unless you explicitly remove them.Practice 2: One Key Pair Per Machine, Per Use Case
Never reuse the same private key across multiple machines or purposes. Create a separate key pair for each laptop, each work context, and each major client relationship.
The logic is simple. If one private key is compromised, it should expose exactly one machine worth of access - not your entire server fleet.
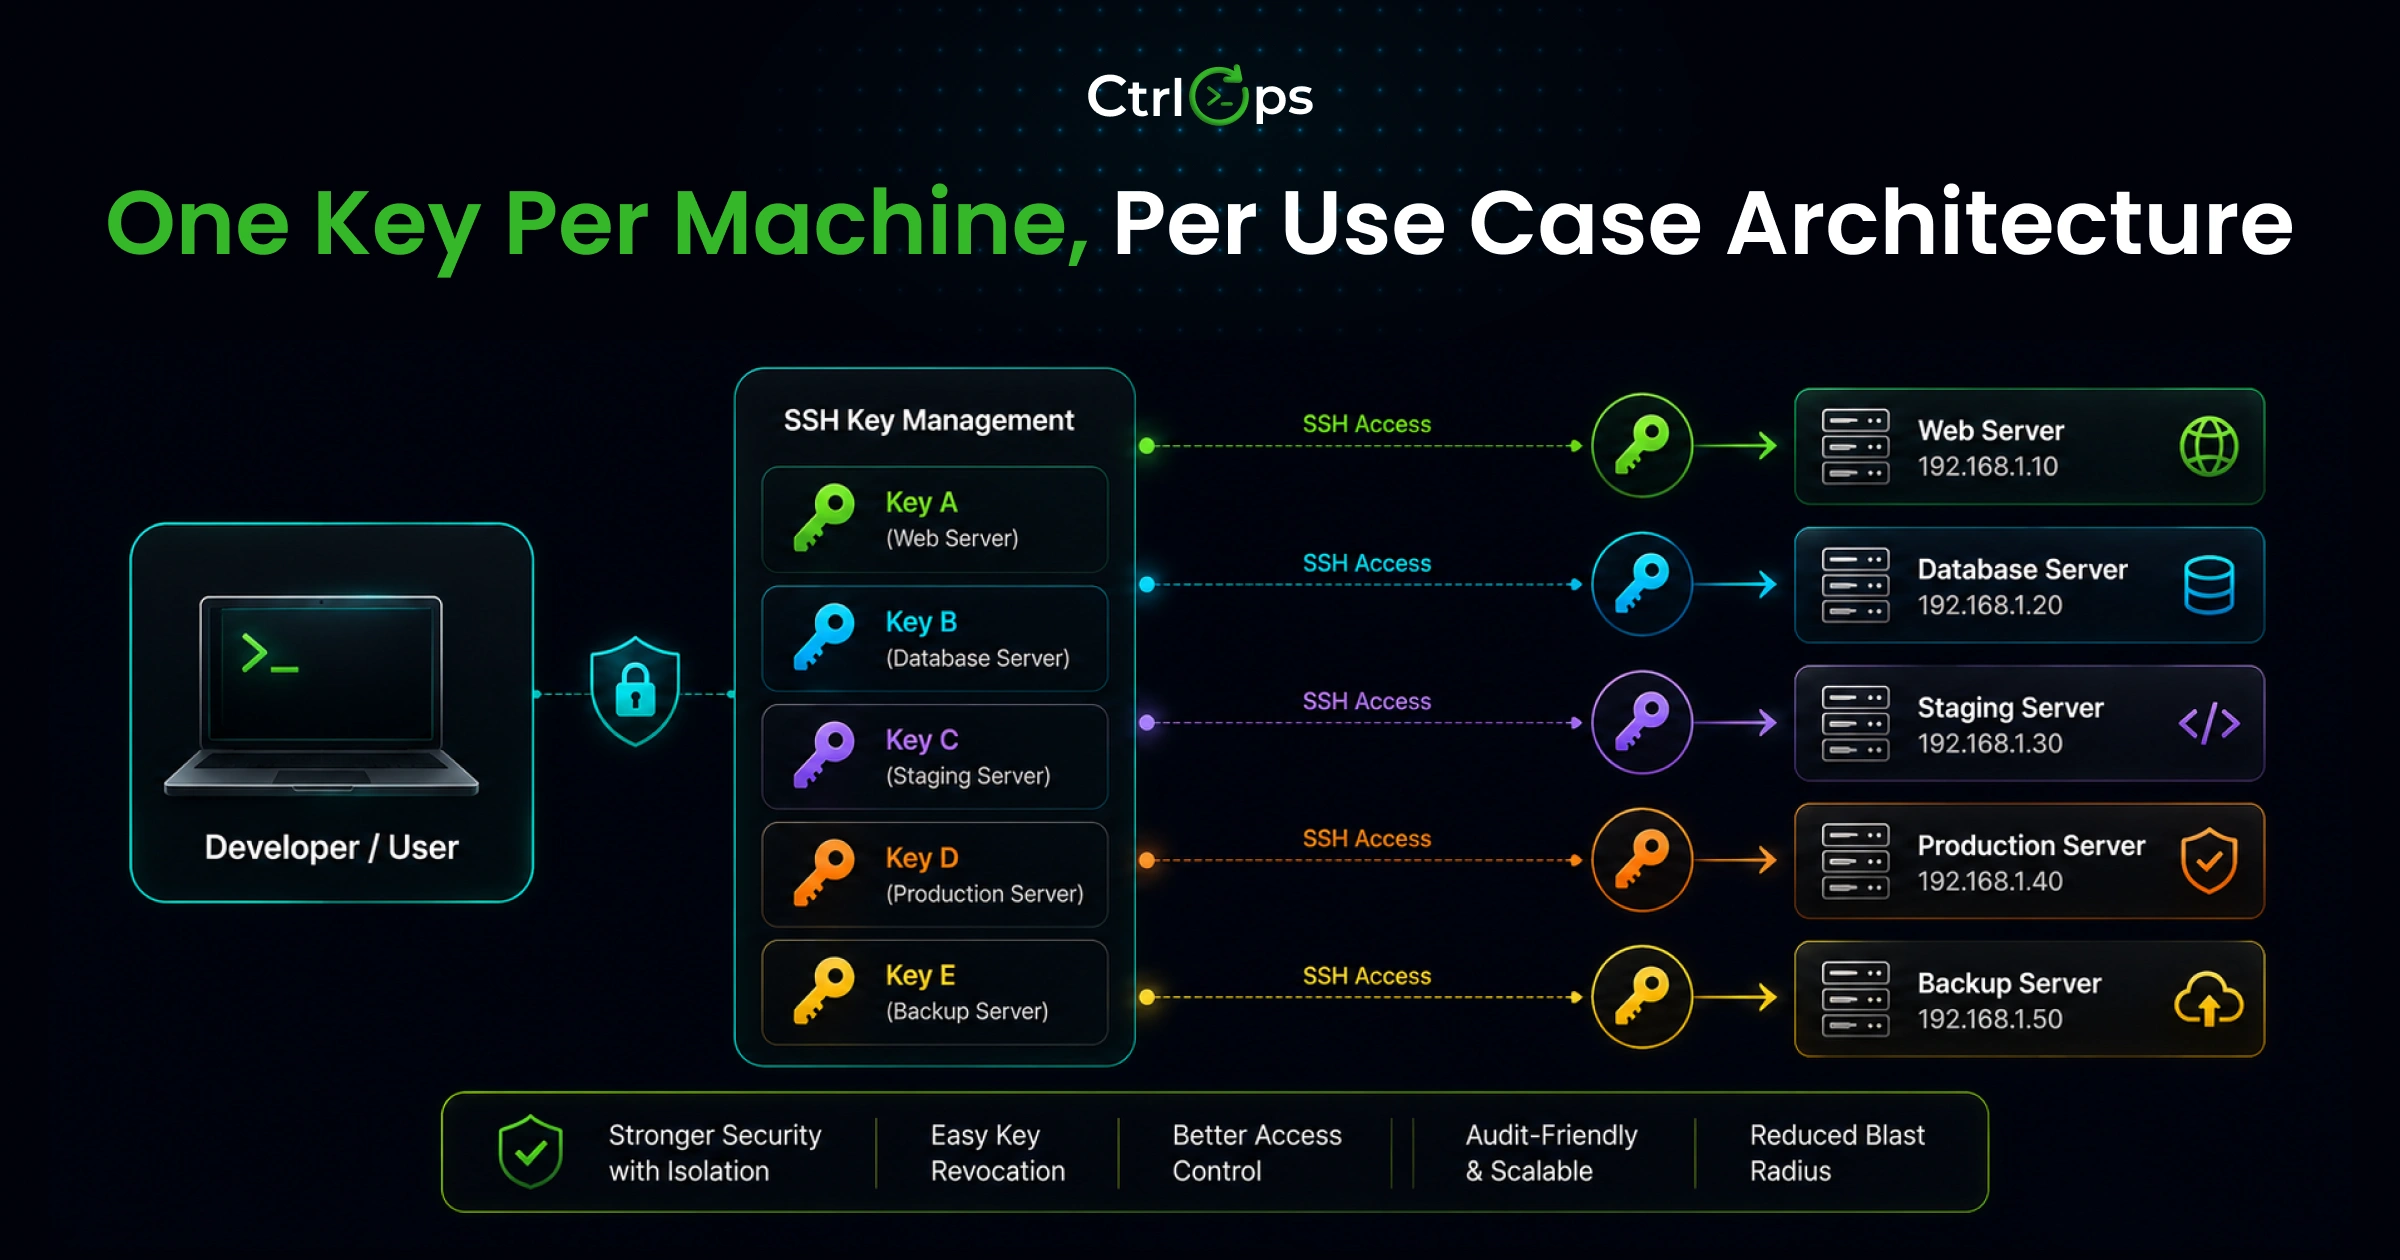
Common key separation patterns:
~/.ssh/
├── id_ed25519               # Personal default key, home laptop
├── id_ed25519.pub
├── client_acme_ed25519      # Client A, freelance project
├── client_acme_ed25519.pub
├── client_beta_ed25519      # Client B, separate key
├── client_beta_ed25519.pub
├── work_laptop_ed25519      # Office machine, different device = different key
└── work_laptop_ed25519.pub
Map each key to the right servers in ~/.ssh/config:
Host acme-prod
  HostName 203.0.113.10
  User ubuntu
  IdentityFile ~/.ssh/client_acme_ed25519

Host beta-staging
  HostName 198.51.100.20
  User ec2-user
  IdentityFile ~/.ssh/client_beta_ed25519
This setup takes 15 minutes to configure once. A compromised laptop key then affects only that laptop's servers - not every client you have ever worked with.
Practice 3: Protect Every Private Key with a Passphrase
A passphrase provides an additional encryption layer for the private key material stored on disk. Possession of the key file alone is insufficient without knowledge of the passphrase. Without a passphrase, anyone who gains physical or file-system access to your machine can use your SSH key right away, with no additional authentication required.
Generate a key with a passphrase:
ssh-keygen -t ed25519 -C "work-laptop-2026"The tool prompts:
Enter passphrase (empty for no passphrase): [type a strong passphrase]
Enter same passphrase again: [confirm]
Use a real passphrase. Four to six random words, a diceware phrase, not a variation of your login password.
Avoid re-typing your passphrase dozens of times a day. Add your key to the SSH agent once per session:
ssh-add ~/.ssh/id_ed25519On macOS, persist it across reboots:
ssh-add --apple-use-keychain ~/.ssh/id_ed25519The agent holds your decrypted key in memory for the session. You type the passphrase once. Every subsequent SSH connection uses it silently. The key is never written to disk unencrypted. This is not a security compromise.
ssh-add call per day. Not adding one costs you an incident response.Practice 4: How to Remove a Passphrase When You Actually Need To
Sometimes you need a passphrase-free key - for automated CI/CD pipelines, cron jobs that SSH into servers, or deployment scripts that run unattended. Removing a passphrase is straightforward. Here is how to do it safely.
Remove a passphrase from an existing key:
ssh-keygen -p -f ~/.ssh/id_ed25519The tool prompts:
Enter old passphrase: [current passphrase]
Enter new passphrase (empty for no passphrase): [press Enter]
Enter same passphrase again: [press Enter]
Your identification has been saved with the new passphrase.
Pressing Enter for the new passphrase sets it to empty, effectively removing it.
Only do this for dedicated automation keys. Create a separate key pair specifically for CI/CD use. Never strip the passphrase from your main developer key.
Correct workflow for automation keys:
- Generate a dedicated key:
ssh-keygen -t ed25519 -C "ci-deploy-key" -f ~/.ssh/ci_deploy_ed25519 - Remove the passphrase:
ssh-keygen -p -f ~/.ssh/ci_deploy_ed25519 - Add only this key's public key to the target server
- Restrict this key to specific commands on the server using the
command=prefix inauthorized_keys - Rotate this key every 90 days or when a project ends
sudo into anything on production, a compromised CI system is a full production breach. Restrict it to exactly what the pipeline needs and nothing more.Practice 5: Avoid Storing Raw Private Keys In Consumer Cloud Storage
Your private key files - id_ed25519, client_acme_ed25519, anything without a .pub extension - should never leave your local machine. Not in Dropbox. Not in Google Drive. Not synced to iCloud. Not pasted into Notion "for backup." And definitely not committed to a Git repository.
According to Wiz Research's November 2025 investigation of the Forbes AI 50, 65% of leading AI companies had verified secret leaks on GitHub - with exposed material including API keys, tokens, and credentials buried in deleted forks, gists, and commit history that standard scanners never reach.
Secure local storage rules:
# Private key, must be 600
chmod 600 ~/.ssh/id_ed25519

# Public key, 644 is fine
chmod 644 ~/.ssh/id_ed25519.pub

# Directory permissions, must be 700
chmod 700 ~/.ssh
For backup: Back up your ~/.ssh/ directory to an encrypted local drive or a password manager with secure SSH key storage. Never sync it as plain files to any cloud folder.
The tool sync problem: Several SSH client tools sync credentials to the cloud by default. If a client NDA prohibits storing their server credentials on third-party servers, verify that your SSH tool is genuinely local-only. Tools that sync keys to cloud servers without explicit user control create a compliance exposure, not just a security one.
CtrlOps stores all credentials locally on your machine only. Nothing syncs to any cloud service. Your keys stay exactly where you put them. Read more about CtrlOps' local-first SSH security architecture.
Practice 6: Add Meaningful Key Comments
The -C flag when generating a key adds a comment to the public key file. Most developers skip it or use their email address. The result: a server's authorized_keys file that looks like this:
ssh-ed25519 AAAA...
ssh-ed25519 AAAA...
ssh-ed25519 AAAA...
Three keys. Zero idea whose they are, when they were added, or which machine they came from.
Use descriptive comments instead:
ssh-keygen -t ed25519 -C "bhautik-macbook-pro-2025"
ssh-keygen -t ed25519 -C "client-acme-deploy-key"
ssh-keygen -t ed25519 -C "ci-cd-github-actions"
Now your authorized_keys reads:
ssh-ed25519 AAAA... bhautik-macbook-pro-2025
ssh-ed25519 AAAA... client-acme-deploy-key
ssh-ed25519 AAAA... ci-cd-github-actions
When you need to revoke a key - especially after someone leaves the team - you know exactly which line to remove without comparing 64-character hex strings.
In CtrlOps' SSH Management tab, the key comment appears as the "Name / Identity" column in the key registry. A useful comment means finding and revoking the right key takes seconds.
Practice 7: Copy Keys to Servers Correctly, Not by Hand
Getting your public key onto a server is a step most developers do once, under pressure, in a way they never document. Here are the three correct methods, from fastest to most manual.
Method 1 (Recommended): ssh-copy-id
When you already have password access to the server:
ssh-copy-id -i ~/.ssh/id_ed25519.pub username@your-server-ipThis appends your public key to ~/.ssh/authorized_keys on the server, creates the .ssh directory if needed, and sets correct permissions - all automatically.
Method 2: Manual append
# Step 1: Copy your public key
cat ~/.ssh/id_ed25519.pub

# Step 2: SSH into the server
ssh username@your-server-ip

# Step 3: Create .ssh directory
mkdir -p ~/.ssh
chmod 700 ~/.ssh

# Step 4: Append the public key
echo "YOUR_PUBLIC_KEY_HERE" >> ~/.ssh/authorized_keys

# Step 5: Set correct permissions
chmod 600 ~/.ssh/authorized_keys
Method 3: Cloud provider dashboard
For first-time setup on AWS, DigitalOcean, Hetzner, or Vultr - add your public key through the provider's UI before provisioning the server. Cleanest option for new instances.
With CtrlOps SSH Setup Wizard: The wizard shows all three methods with pre-filled commands and a one-click Copy Key button for your public key. You click Copy Key, run one command in a terminal, done. No hunting for the key file path, no typos in a long key string. Follow the CtrlOps first connection guide to walk through the full process.
See the full server add and key setup flow from zero:
chmod 600 ~/.ssh/authorized_keys and chmod 700 ~/.ssh are not optional. A world-readable authorized_keys file causes OpenSSH to silently reject key authentication. The error says "Permission denied (publickey)" - but the actual cause is a permissions mismatch, not a key problem. If octal permission values never quite stick in your memory, our free chmod calculator translates them both ways.Practice 8: Manage SSH Access Per User, Not Per Team
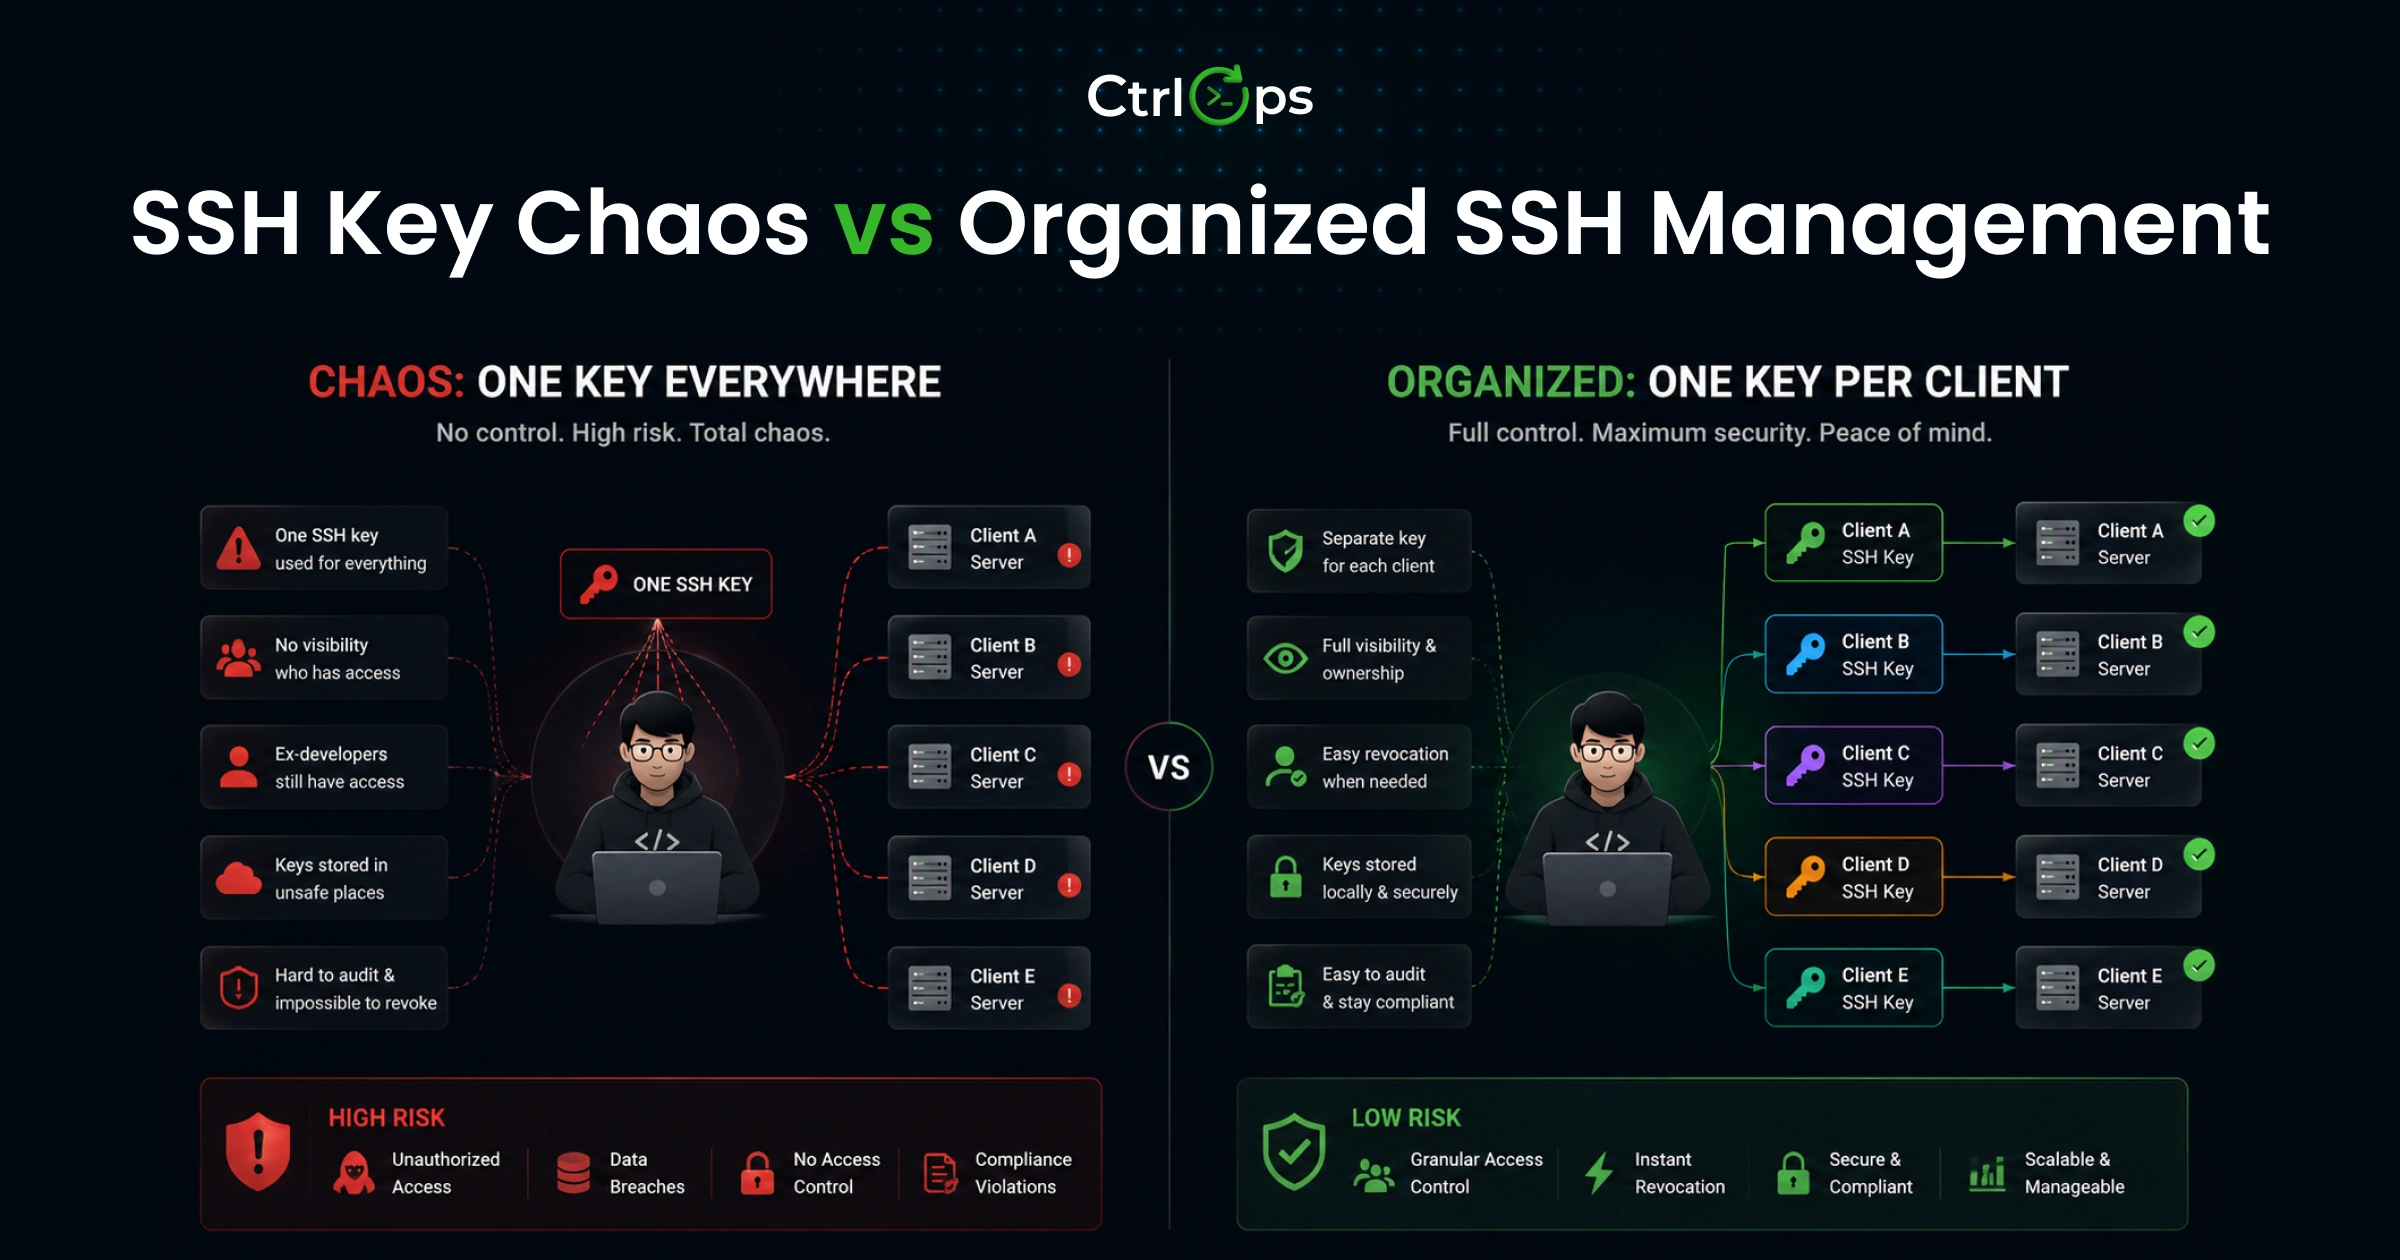
Every person who needs SSH access to a server should have their own key pair. Their public key goes into authorized_keys. No sharing private keys between teammates.
This is the rule most small teams break - and the one that causes the most damage when someone leaves.
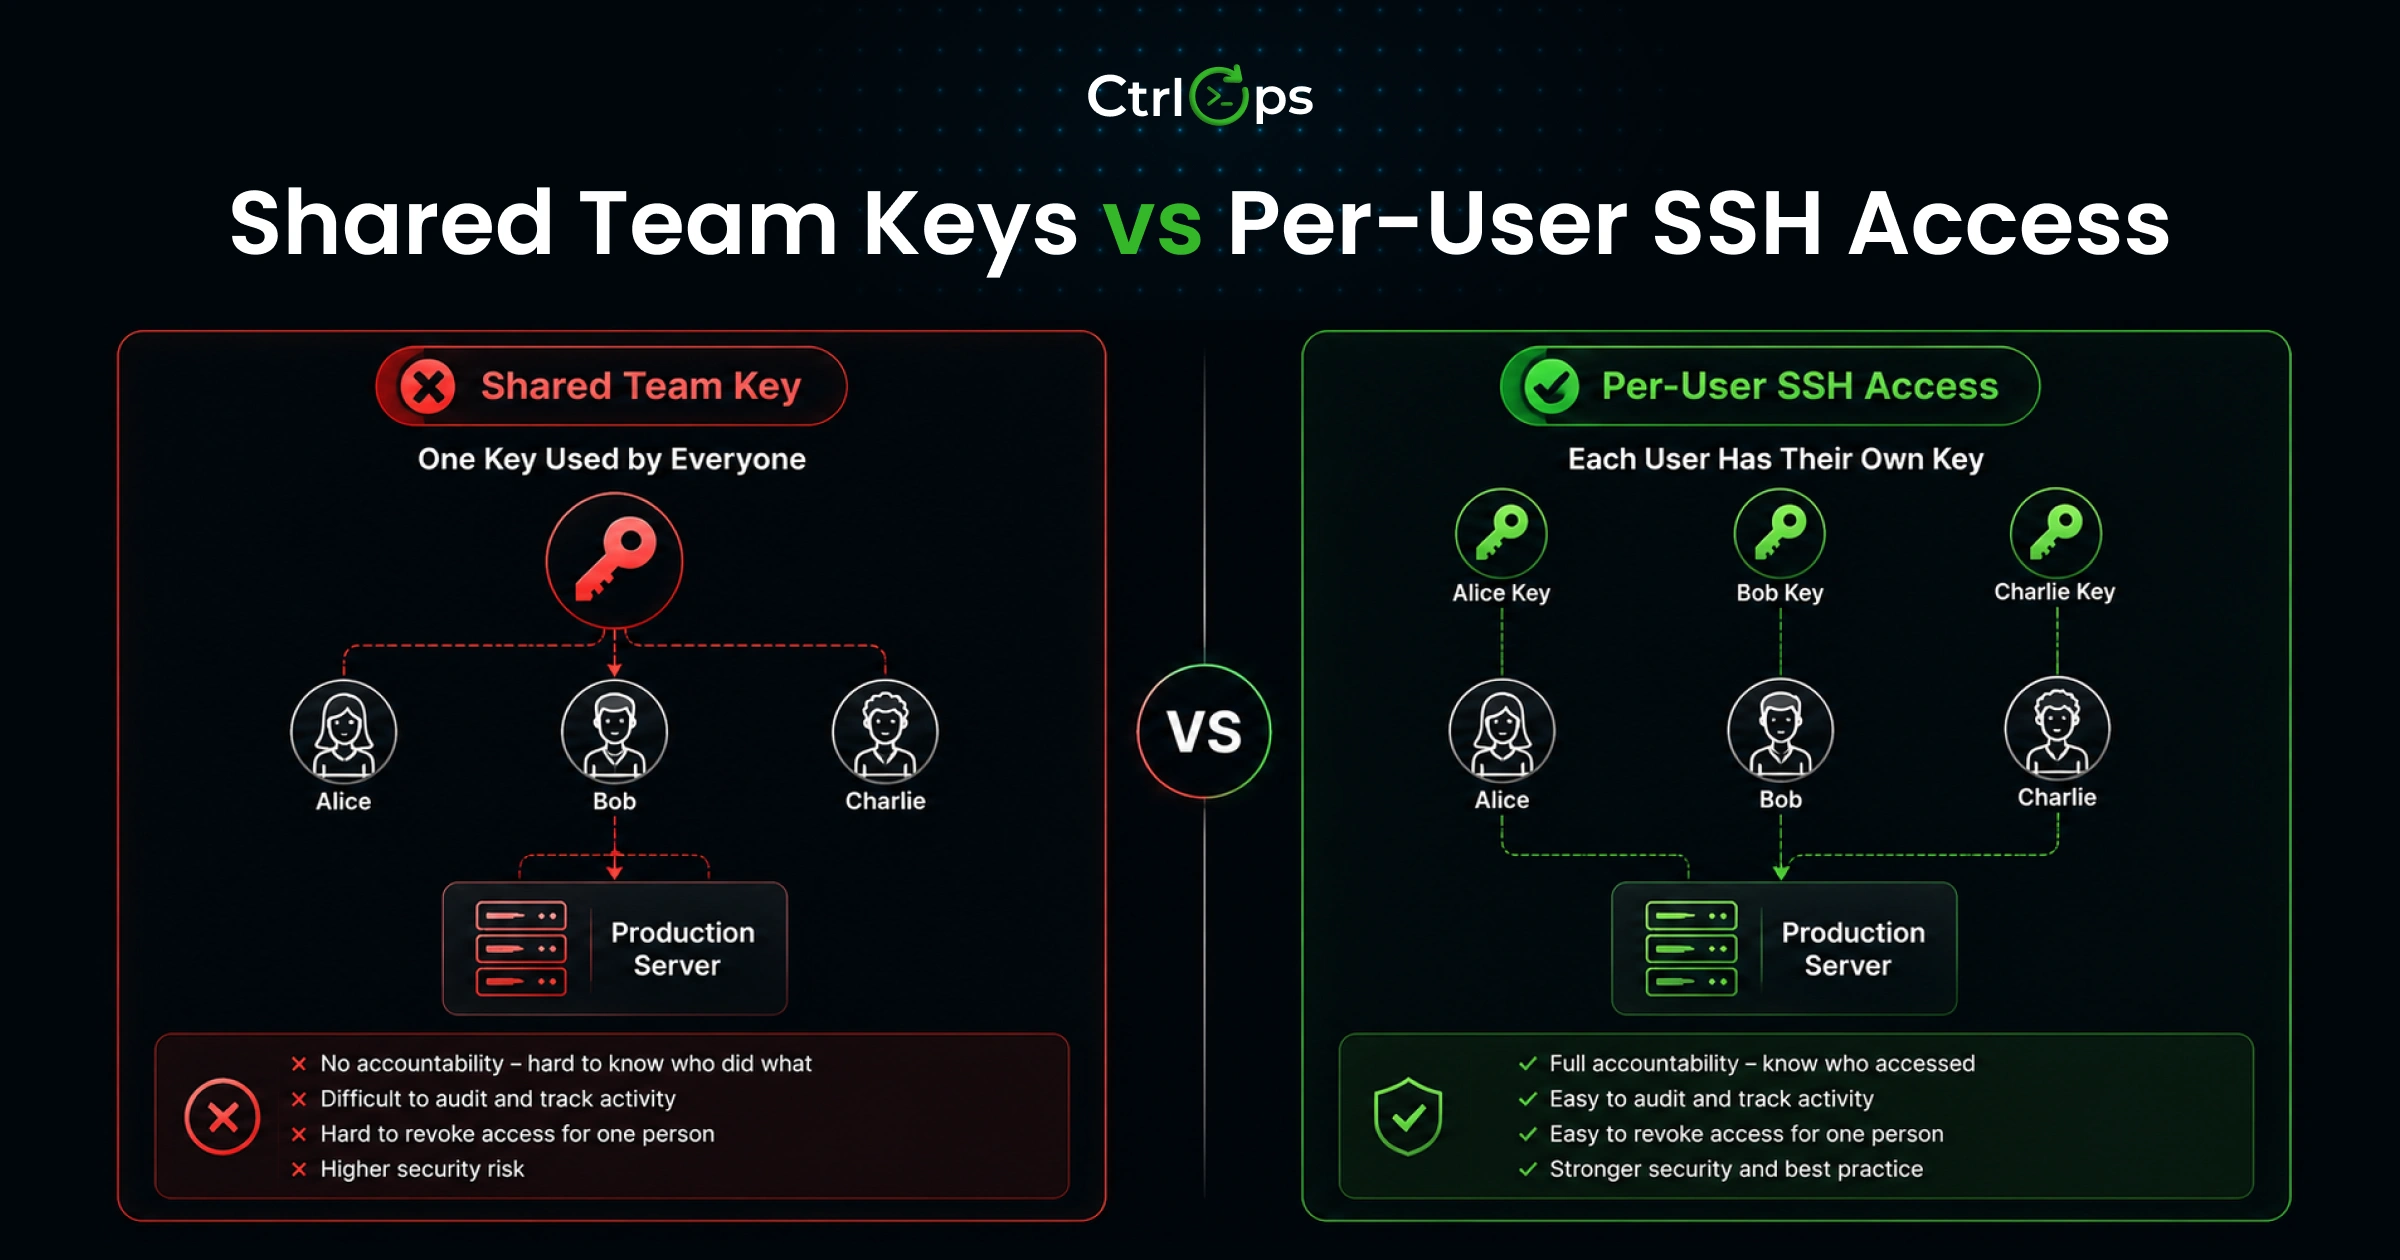
Shared key scenario (dangerous):
The team creates one team_deploy_key. Everyone uses the same private key. A developer leaves. To be truly safe, you'd need to regenerate and redistribute the key to everyone still on the team. In practice, nobody does this. The old key stays valid for months or years.
Per-user key scenario (correct):
Each developer generates their own Ed25519 key pair. Each developer's public key is added to authorized_keys on the servers they need access to. A developer leaves - revoke their single entry from authorized_keys in 30 seconds. No key redistribution. No disruption for anyone else.
A clean authorized_keys file looks like:
ssh-ed25519 AAAA... priya-macbook-2025
ssh-ed25519 AAAA... raj-work-laptop
ssh-ed25519 AAAA... ci-deploy-github-actions
Removing Raj's access means deleting one line. That is it.
In CtrlOps' SSH Management tab, each key appears as a named row with a Revoke button. Managing per-user access across multiple servers takes under 2 minutes - no terminal required.
Practice 9: Revoke Access Immediately When Someone Leaves
SSH key revocation is the step that consistently does not happen on time. When someone leaves your team or a project ends, their SSH key is active on every server you gave them access to - until you manually remove it.
Former employees retaining access after leaving an organization remain a significant security risk and are a common, though often underreported, source of breaches in small teams. It does not require malicious intent. The risk exists even when someone leaves on good terms: their laptop can be stolen, their credentials can be phished, or their machine can be compromised through an unrelated vulnerability. According to DTEX Systems' 2023 Insider Risk Investigations Report, 12% of employees take sensitive IP with them when they leave an organization - including customer data, employee data, health records, and sales contracts.
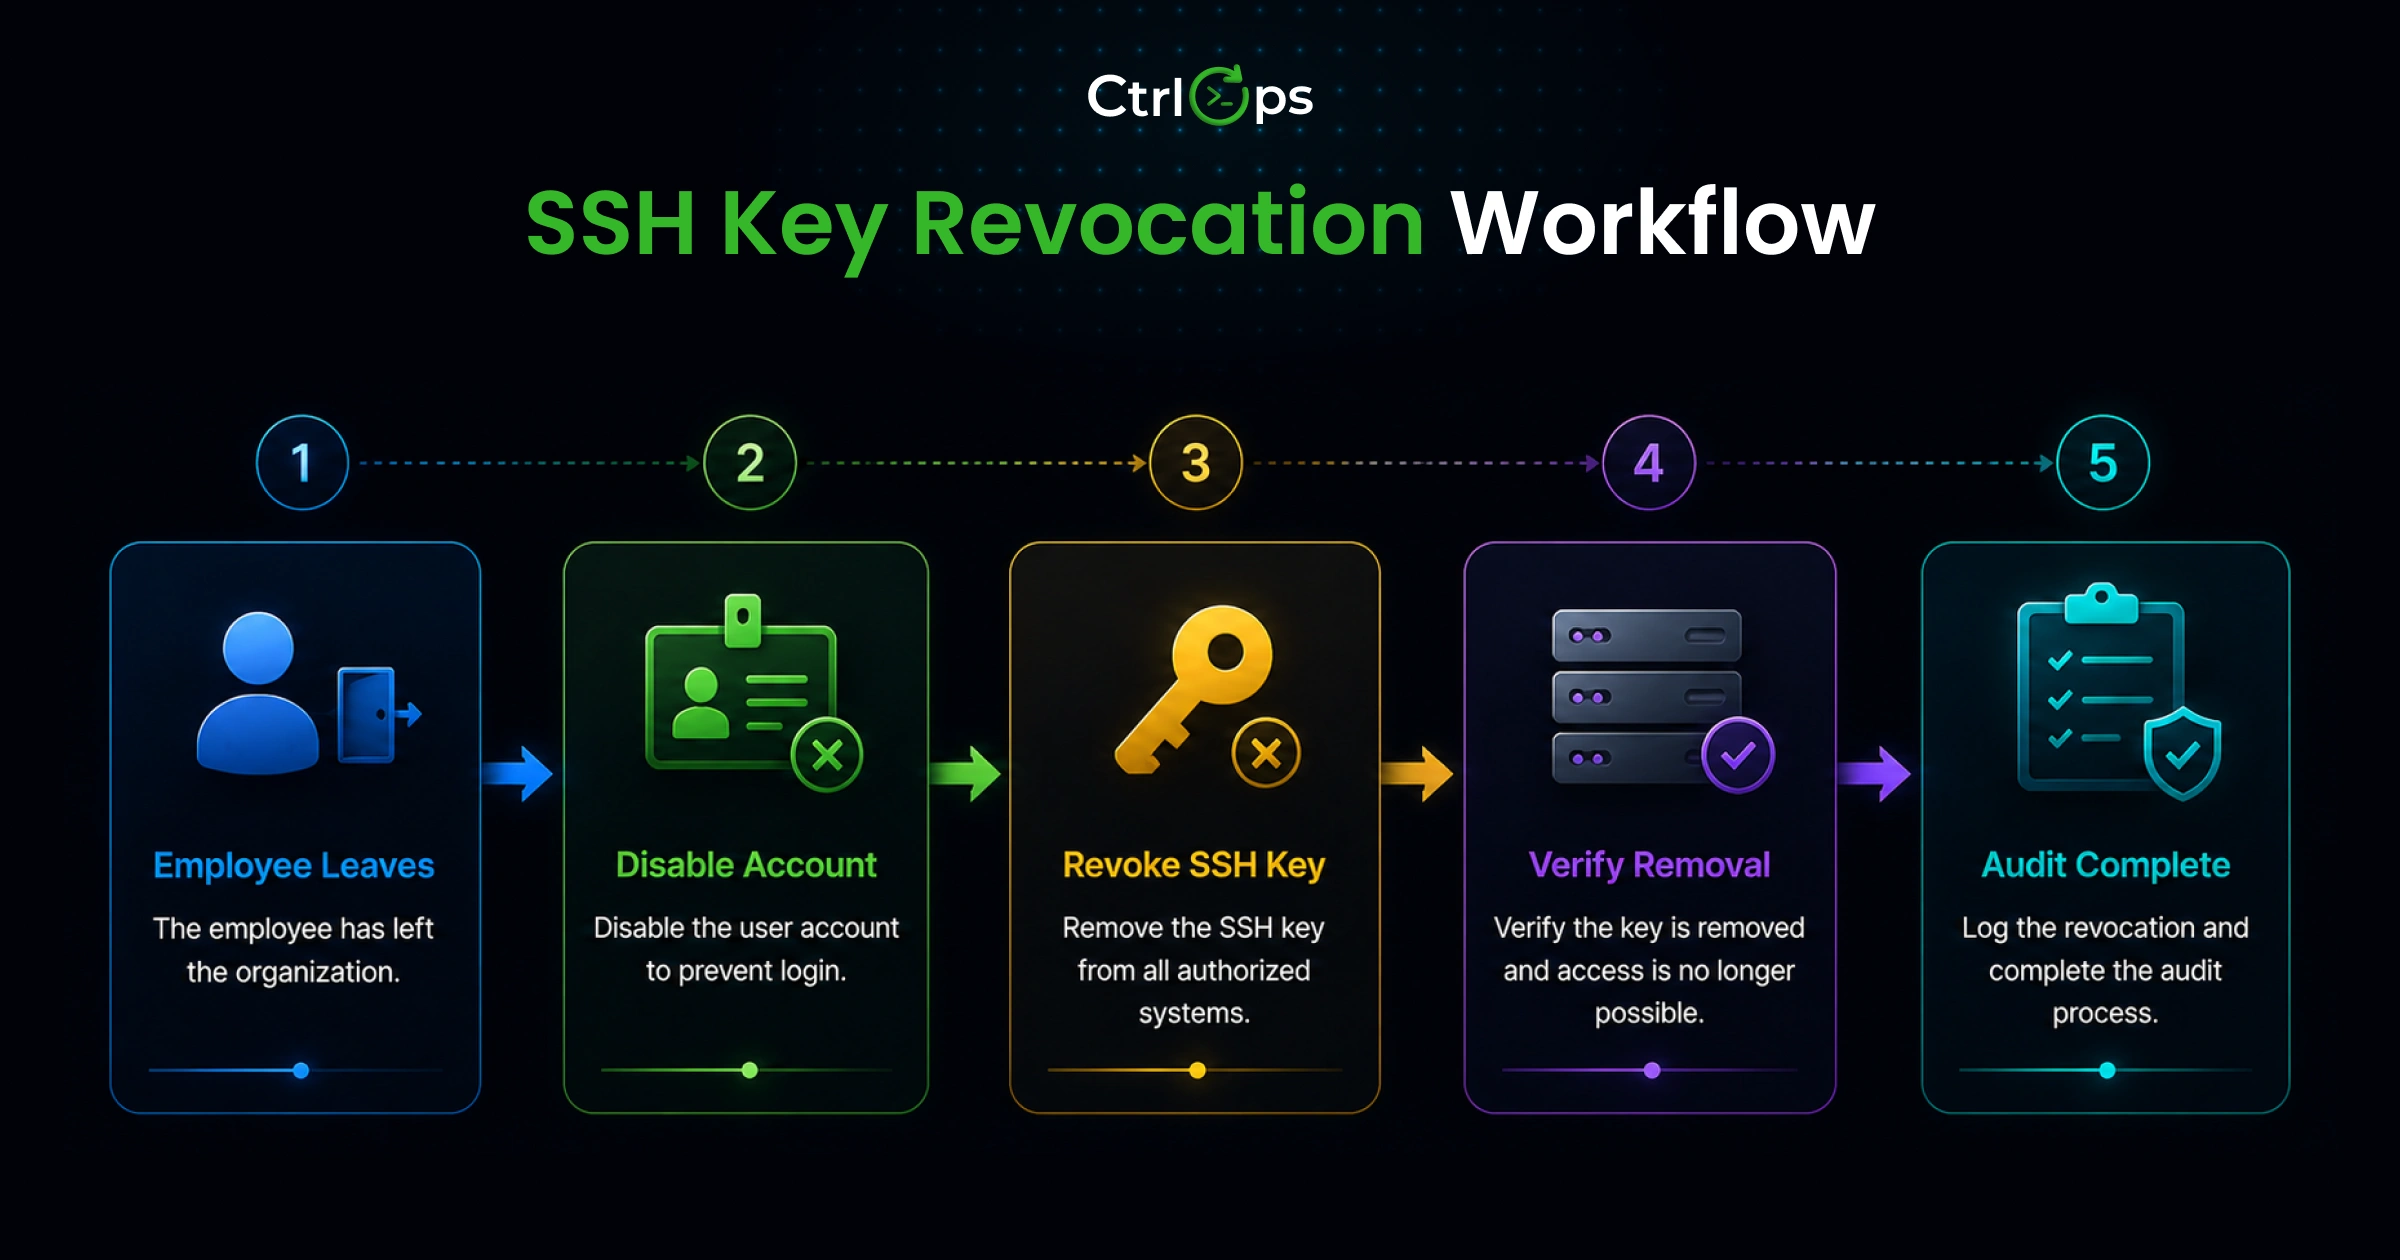
The manual CLI revocation process:
# SSH into each affected server
ssh username@server-ip

# Open authorized_keys
nano ~/.ssh/authorized_keys

# Find and delete the line with their key comment
# Save and close

# Repeat for every server they had access to
If someone had access to 8 servers, this is 8 separate SSH sessions, 8 manual file edits, 8 opportunities for mistakes. Realistically it takes 20 to 30 minutes and often gets deprioritized to "I'll do it tomorrow."
With CtrlOps SSH Management:
- Connect to the server and click the SSH Management tab
- Find the departing developer's key, visible by name and comment
- Click Revoke
- Confirm: "Revoke Now"
Done. The key is removed from authorized_keys immediately. Repeat per server - each one takes under 30 seconds.
Practice 10: Set Correct File Permissions Every Time
OpenSSH is strict about file permissions. If permissions on your key files or .ssh directory are too open, SSH silently rejects the connection - and the error message points to "authentication failed," not "wrong permissions." This mismatch sends developers down the wrong debugging path for hours.
Required permissions:
# Your .ssh directory
chmod 700 ~/.ssh

# Your private key
chmod 600 ~/.ssh/id_ed25519

# Your public key
chmod 644 ~/.ssh/id_ed25519.pub

# The authorized_keys file on the server
chmod 600 ~/.ssh/authorized_keys

# The .ssh directory on the server
chmod 700 ~/.ssh
Quick permissions audit:
ls -la ~/.sshAnything showing rw-rw-rw- (666) or rwxrwxrwx (777) will cause silent auth failures. Correct immediately.
OpenSSH refuses to use a key that is not properly protected because a world-readable private key file means any user on that machine could copy it. This is a security feature, not a quirk.
On Windows: If you see "SSH Agent Not Running" errors, run these commands in PowerShell as Administrator:
Set-Service -Name ssh-agent -StartupType Automatic
Start-Service ssh-agent
ssh-add $env:USERPROFILE\.ssh\id_ed25519~/.ssh/authorized_keys is the top cause of "key authentication not working even though I definitely added the key." Always run chmod 600 authorized_keys and chmod 700 ~/.ssh after any manual key addition on a server.Practice 11: Audit Your SSH Keys Regularly
You should know exactly which keys exist on each server and why. Most developers do not - they add keys when onboarding and never look again. Keys accumulate. Old ones from past contractors, decommissioned CI systems, and replaced laptops stay indefinitely.
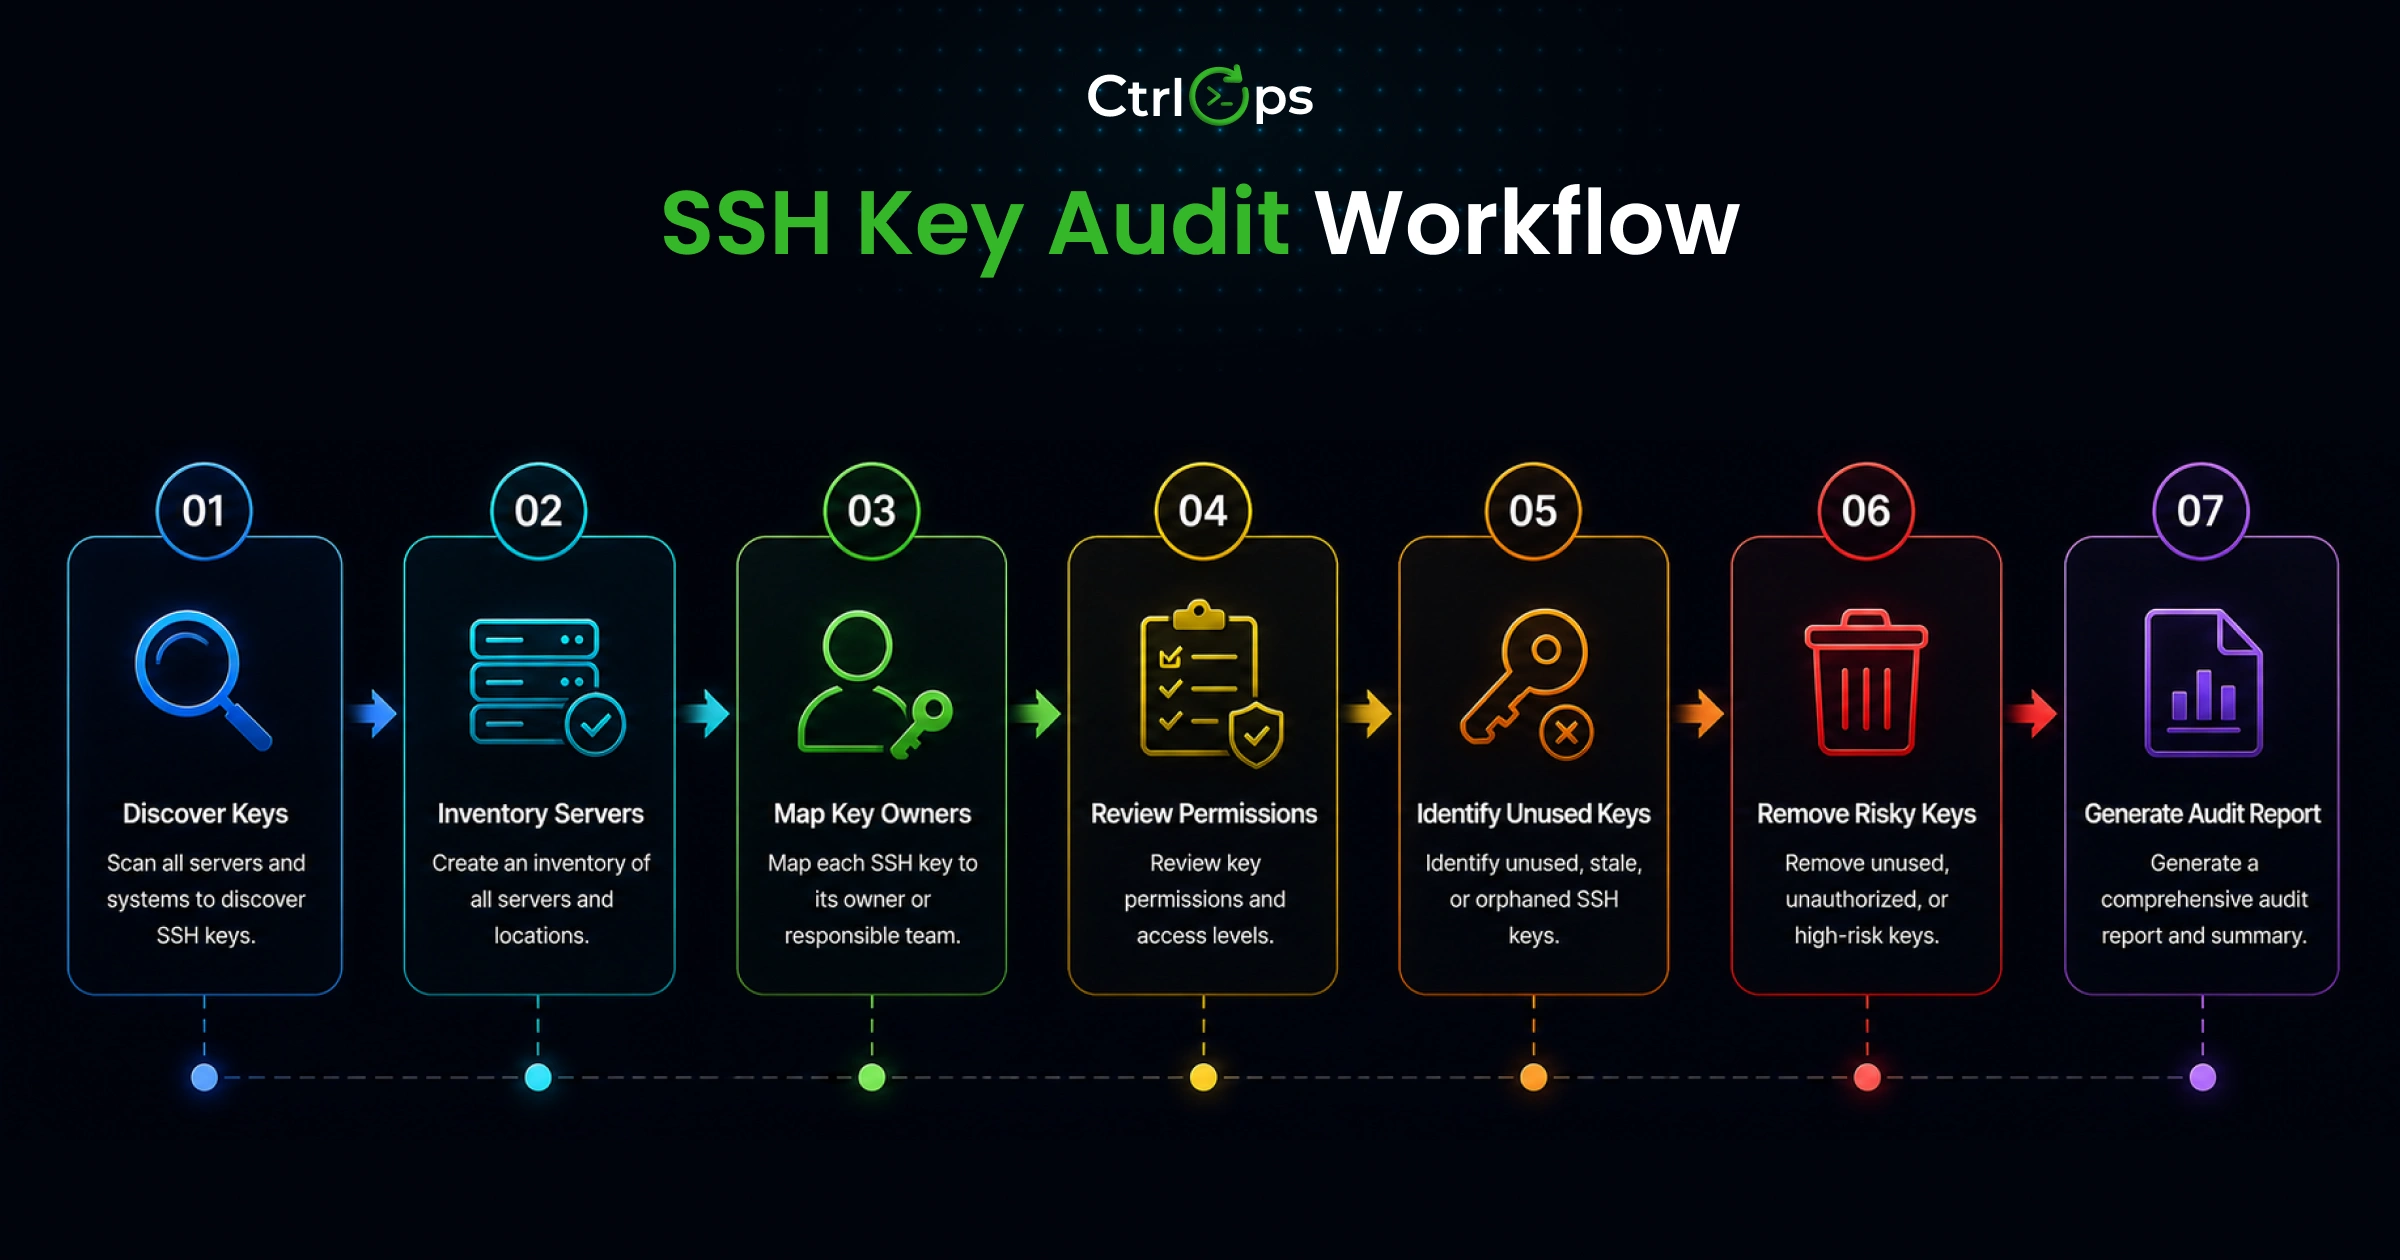
Manual SSH key audit on your local machine:
# List all key files
ls -la ~/.ssh/*.pub

# Check what is loaded in the SSH agent
ssh-add -l

# Check key fingerprints
ssh-keygen -lf ~/.ssh/id_ed25519.pub
Manual SSH key audit on a server:
# SSH in and view all authorized keys
cat ~/.ssh/authorized_keys

# Count entries
wc -l ~/.ssh/authorized_keys
For each entry, ask: Do I know whose key this is? Are they still on the team or project? Does this key still need this level of access?
In CtrlOps SSH Management tab: Connect to any server and the tab shows a full visual registry - key type (Ed25519 in green, RSA in blue), the key identity or comment, and the blurred key string you can reveal by clicking. Total key count, Ed25519 count, and RSA count show as counters at the top of the view. No terminal access required to audit.
Pair SSH key audits with CtrlOps' real-time infrastructure monitoring dashboard - CPU, RAM, and disk usage visible per server without running a single command. A server sitting at 91% disk with 5 unknown authorized keys is two separate problems. CtrlOps surfaces both in the same view.
Practice 12: Use AI to Diagnose SSH Key Errors
SSH key errors are notoriously cryptic. Permission denied (publickey) tells you nothing about whether the problem is the key itself, the permissions, the authorized_keys file, the SSH daemon config, or something else entirely. The typical debug loop: search Stack Overflow, find answers from 2015, try three commands, still broken.
With CtrlOps AI Terminal:
Open the AI Terminal tab on your connected server and type exactly what is happening:
"I'm getting Permission denied (publickey) when connecting. I've added my Ed25519 public key to authorized_keys but it's still failing."
The AI reads your server's current state and generates targeted diagnostic commands. Those commands identify the actual issue: wrong permissions on authorized_keys, PubkeyAuthentication no in /etc/ssh/sshd_config, or a key that was appended with a trailing space that invalidated it.
Every suggested command appears for your review before anything runs. You approve it. The AI is approval-gated - it never executes commands automatically. For power users who want to skip the approval step, Auto-Run can be enabled in the AI Terminal settings.
For SSH key issues involving recent OpenSSH changes or distribution-specific quirks, enable Web Search in the AI Terminal. The AI checks current documentation from Tavily, Brave, or DuckDuckGo before generating commands - meaning answers based on what is actually true today, not training data from a year ago.
CtrlOps uses a Bring Your Own AI Key (BYOK) model. Connect OpenAI, Anthropic Claude, Google Gemini, or any OpenAI-compatible provider. Your AI queries never pass through CtrlOps servers - they go directly from your machine to your chosen AI provider.
See the approval-gated workflow in action:
Practice 13: Consider FIDO2 Hardware Keys for Production Access
Standard SSH keys live on disk. A FIDO2 hardware key changes the security model entirely - the private key never leaves the physical device.
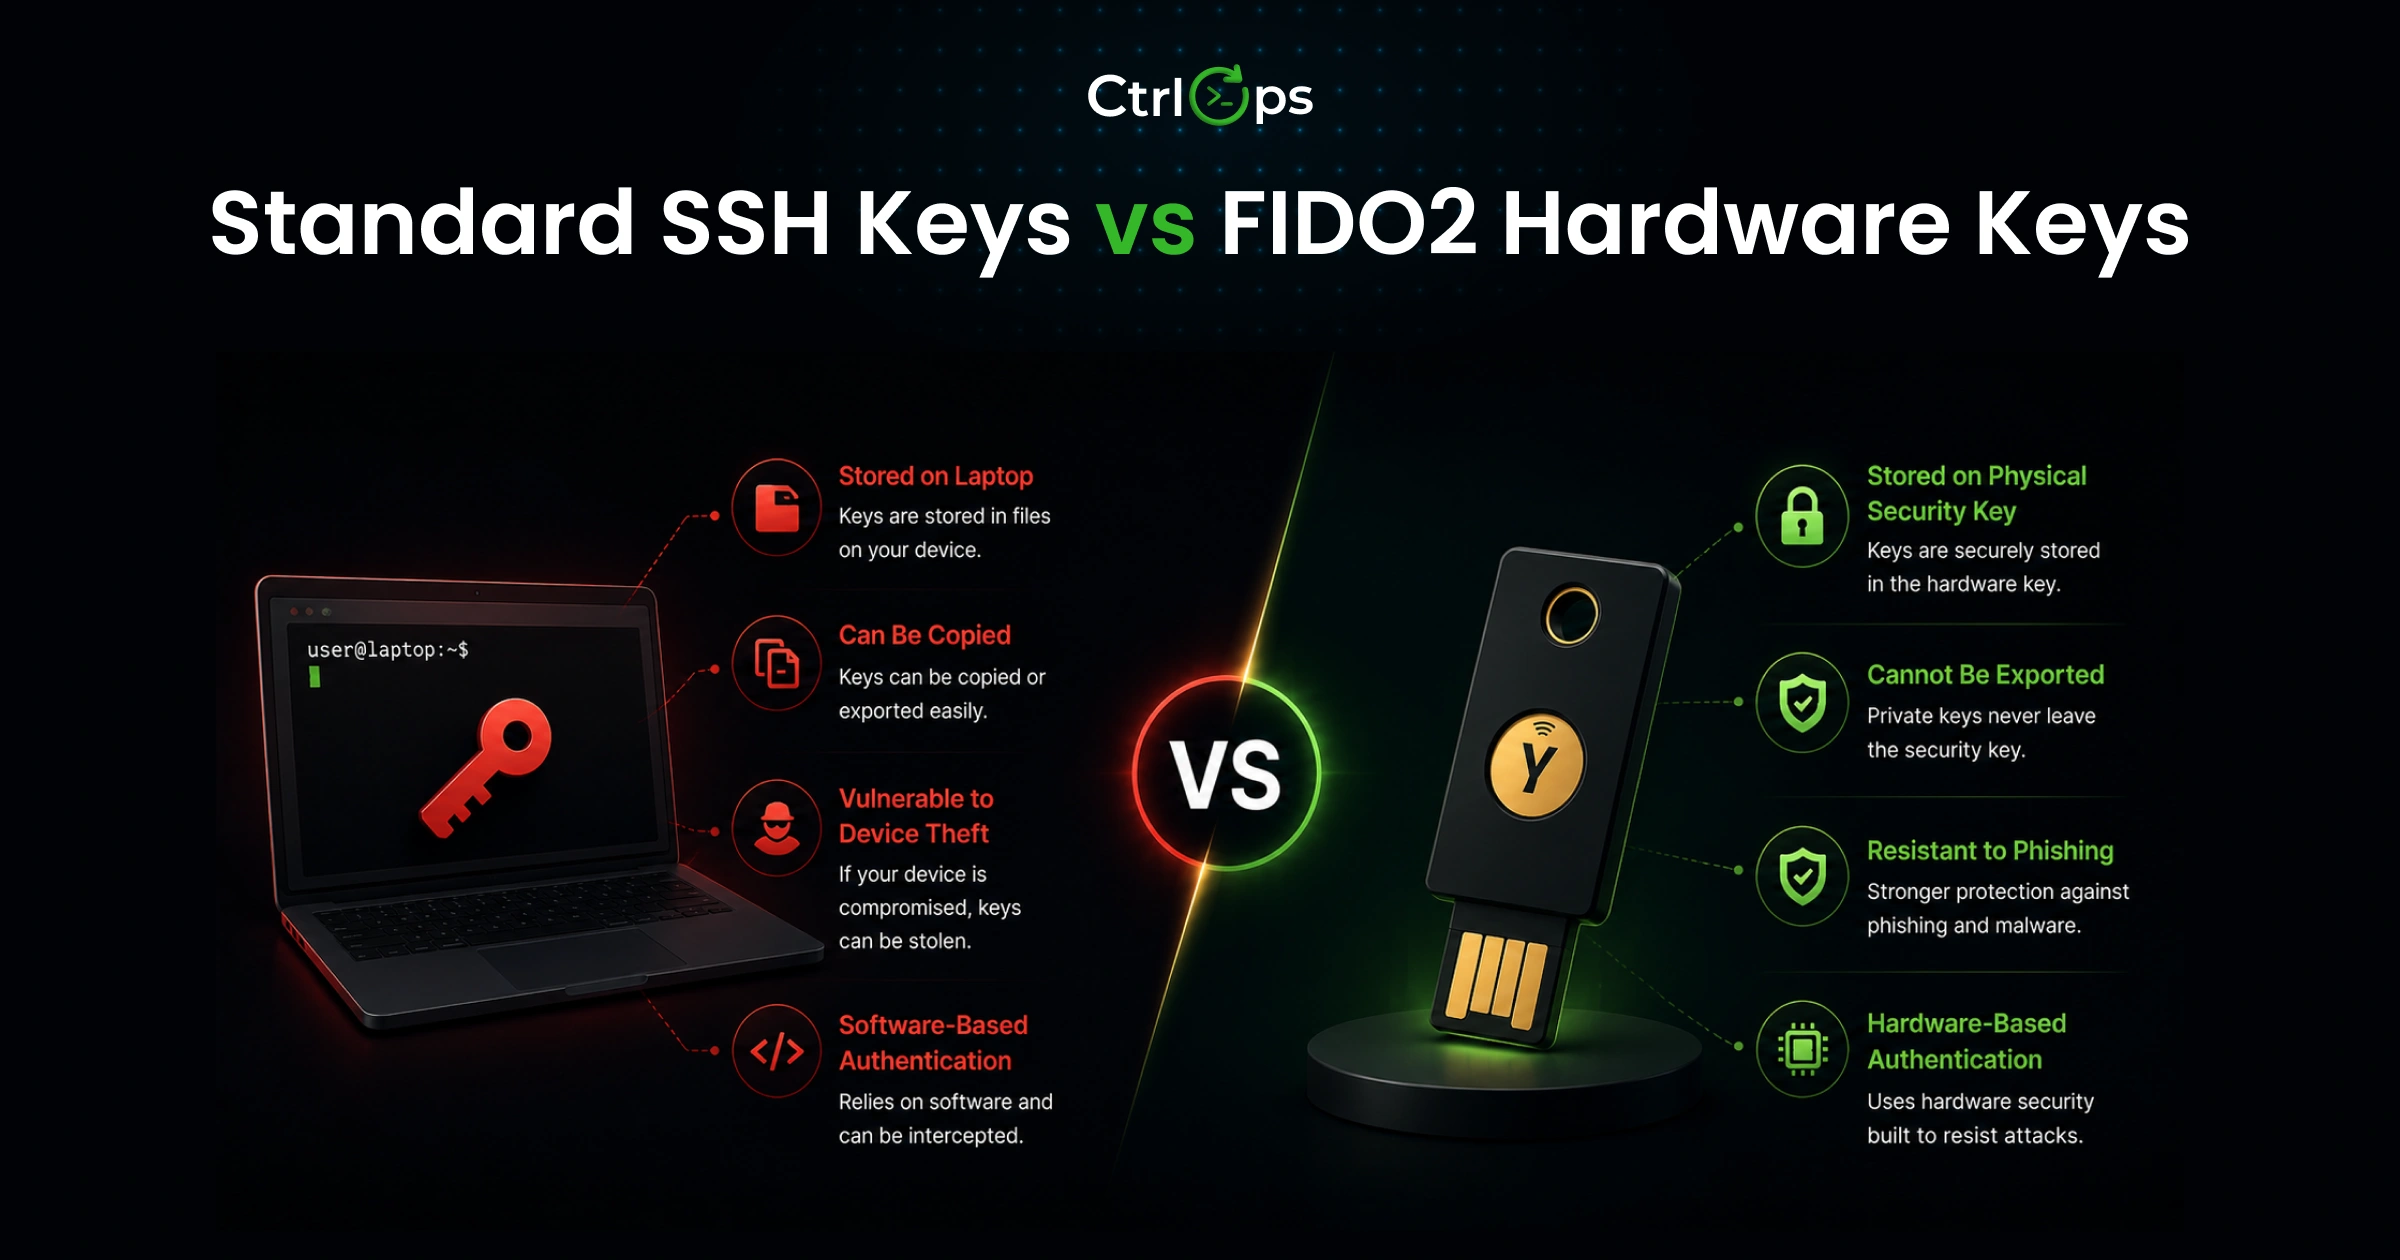
When you use an ed25519-sk key (the -sk stands for security key), the private key is generated and stored inside a FIDO2 hardware authenticator like a YubiKey. Your machine only holds a "key handle stub" - a reference file that is useless without the physical device. When you connect to a server, the server sends a challenge, and your YubiKey signs it. You touch the key to confirm presence. No software on your machine ever sees the actual private key.
Setup (requires OpenSSH 8.2+ and a FIDO2-compatible hardware key):
# Generate a hardware-backed SSH key
ssh-keygen -t ed25519-sk -O resident -C "yubikey-prod-2026"

# You'll be prompted to touch your YubiKey during generation
# The .pub file goes to the server as normal - the private key stays on the hardware

# Copy the public key to your server
ssh-copy-id -i ~/.ssh/id_ed25519_sk.pub username@server-ip
The -O resident flag stores the key handle on the YubiKey itself - so you can use the same key on multiple machines by loading it from the hardware: ssh-add -K.
When to use FIDO2 keys:
- Any production server where a stolen laptop would otherwise mean immediate access
- Shared workstations or CI runners where multiple people have physical access
- Any environment where "physical presence required" is a meaningful security constraint
This is not a requirement for every developer workflow. Standard Ed25519 keys with passphrases cover most freelance and small-team use cases. But for teams managing critical production infrastructure in 2026, hardware-backed ed25519-sk keys are becoming the standard - as documented by Yubico's OpenSSH integration guide.
ed25519-sk key type is supported natively in OpenSSH 8.2+ and requires only a physical touch (not a PIN, unless you add -O verify-required) to authenticate.Practice 14: Know When SSH Certificates Replace Key Management
For teams beyond roughly 15 to 20 people, individual authorized_keys management at scale becomes its own problem. SSH certificates offer a different model.
Instead of adding each developer's public key to every server's authorized_keys, you configure servers to trust any certificate signed by a central Certificate Authority (CA). A developer requests a short-lived certificate - typically valid for 15 minutes to 8 hours - uses it to connect, and it expires automatically. No standing access. No authorized_keys files to maintain per server. No revocation step when someone leaves - their certificate simply expires.
This is worth knowing about, not necessarily worth implementing today. For a solo developer or a team of 5, per-user Ed25519 keys with manual revocation (as covered in Practices 8 and 9) is simpler and sufficient. For a 30-person engineering org managing 80 servers, SSH certificates are the right answer.
The practical signal: if you find yourself regularly forgetting to revoke keys when projects end, or if auditing authorized_keys across your fleet feels unmanageable, look at SSH certificate authorities. HashiCorp Vault and AWS Systems Manager Session Manager both offer managed CA implementations that integrate with existing infrastructure.
authorized_keys sprawl at larger team sizes. If you are managing fewer than 20 people across a handful of servers, per-user key pairs with a solid revocation process covers you. If you are beyond that, certificate-based SSH is worth evaluating.Why CtrlOps Is the Right Tool for SSH Key Management
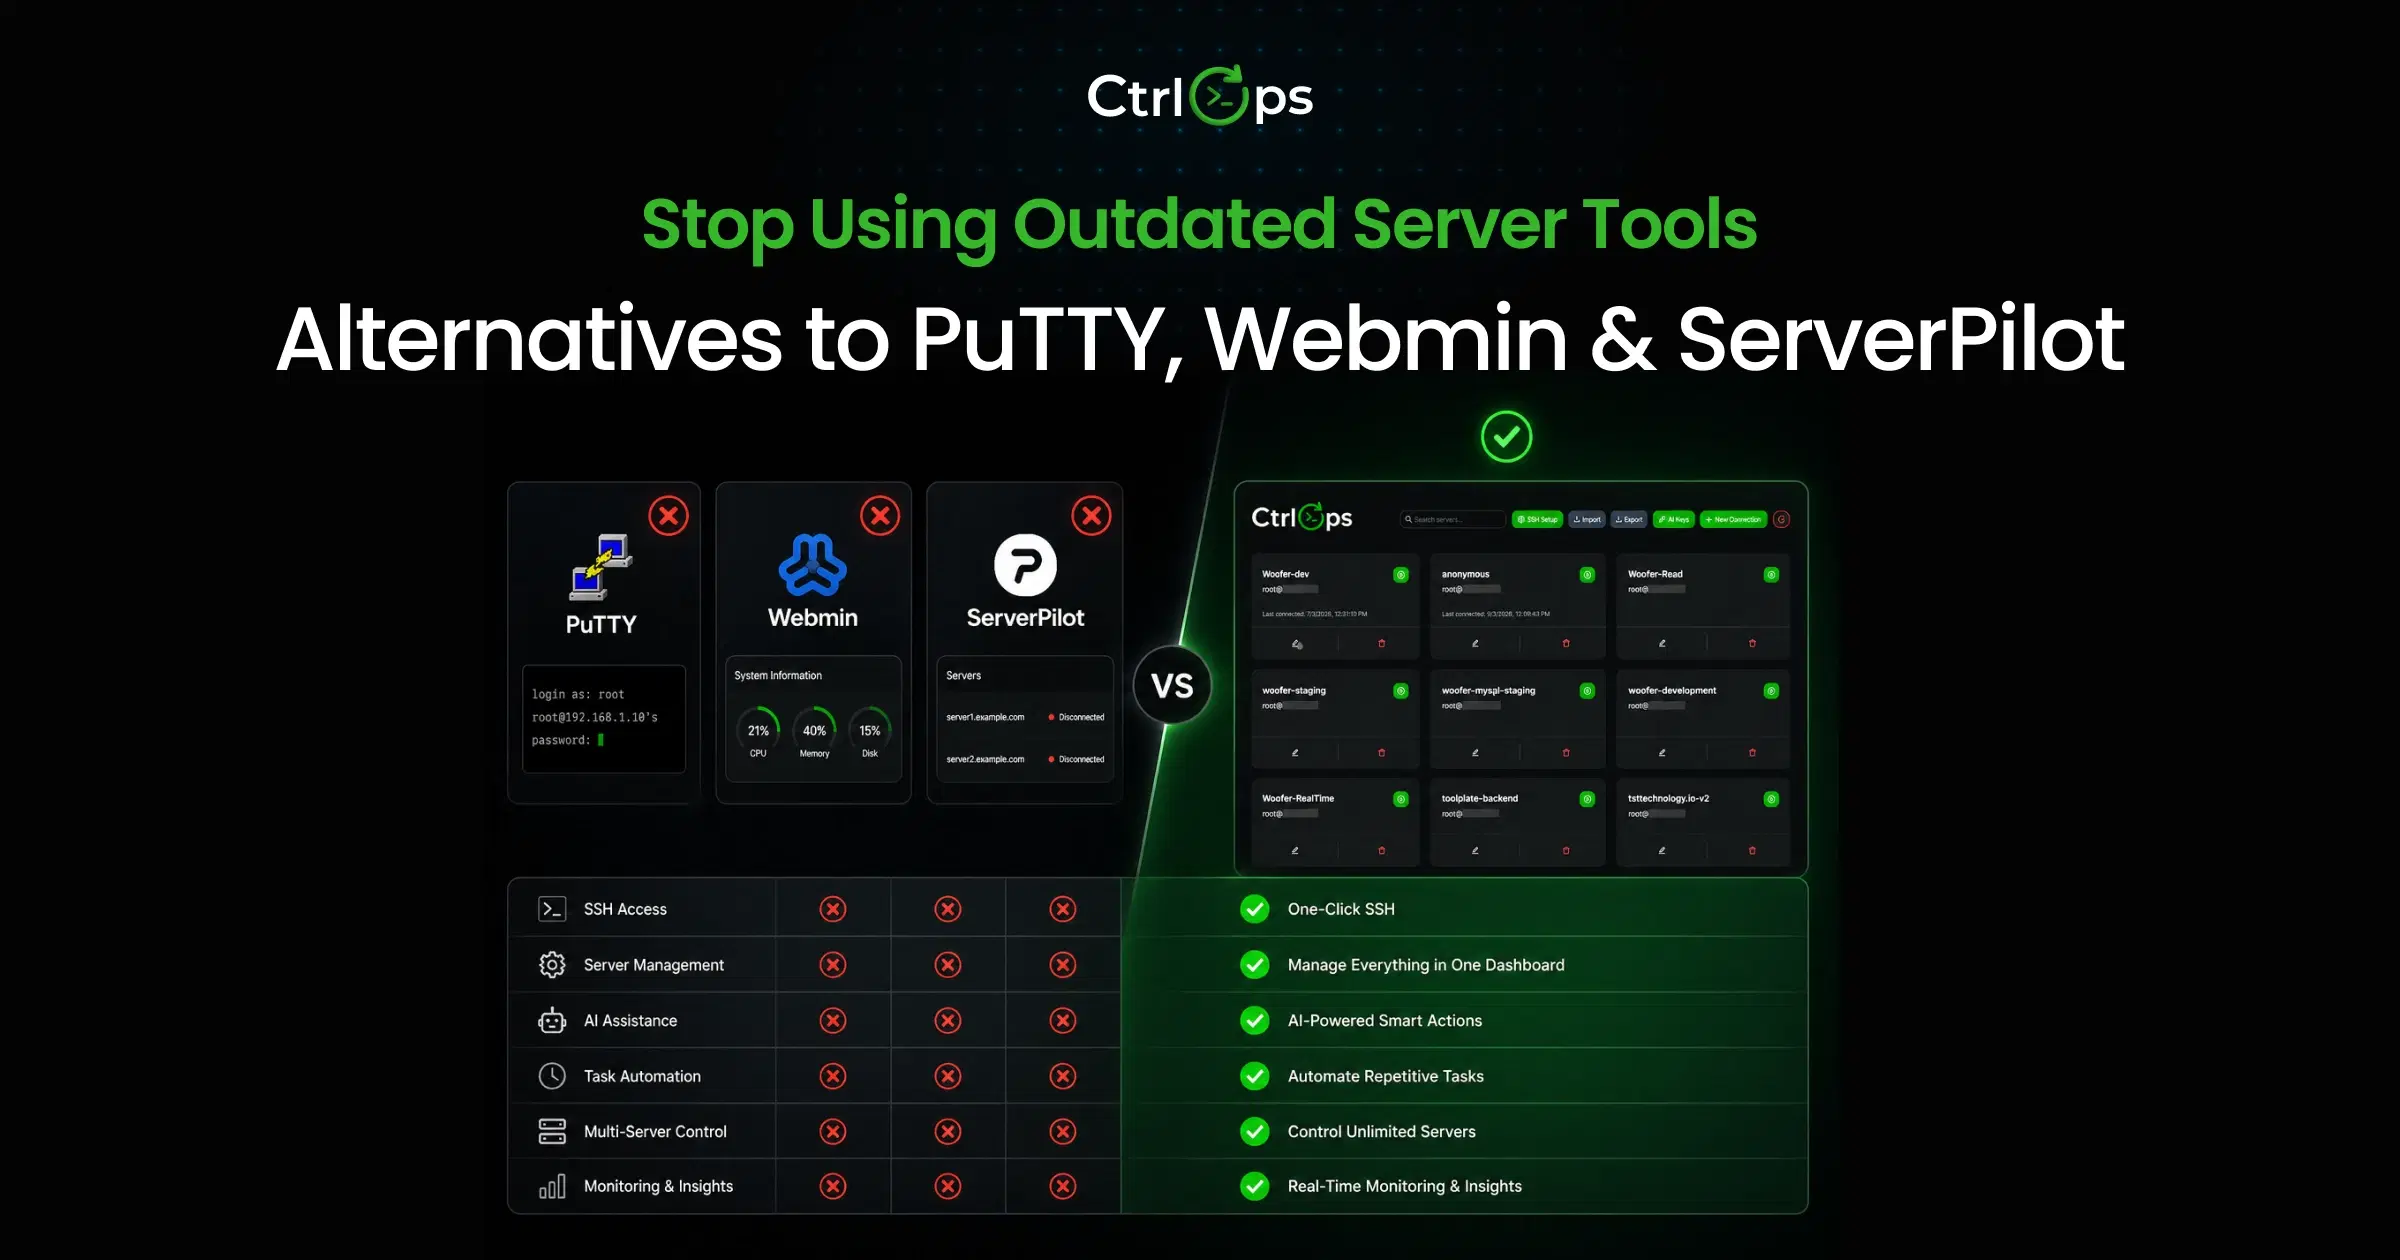
Every practice in this guide can be done manually through the CLI. The question is whether you will do it consistently - under pressure, at 11PM, when someone just left the team and you are SSHing into 8 servers one by one.
CtrlOps turns the SSH key management practices that developers skip into actions that take less time than skipping them.
SSH Setup Wizard guides you through generating an Ed25519 key pair, verifying SSH is installed on your machine, and getting your public key onto the server using the correct method for your setup. Three steps. No documentation lookup.
SSH Management tab shows every authorized key on a connected server in a visual registry. Key type (Ed25519 or RSA) is labeled and color-coded. The key comment shows as the entry name so you can identify ownership at a glance. Add keys by pasting a public key directly. Revoke any key with one click and confirm. The key is removed from authorized_keys immediately.
AI Terminal with approval gate diagnoses SSH errors against your actual server state, not generic Stack Overflow answers. Every command is shown for review before execution. For critical servers, this means no accidental wrong sshd_config edit. Enable Web Search for real-time documentation lookups. Use the Script Directory to save reusable server setup commands with variables - write your SSH hardening script once, run it across every server with one click.
Automated backups mean that even if a key misconfiguration locks you out of a server temporarily, your data is protected. Set backup schedules once and stop worrying about the day a disk fails or a bad config update corrupts your environment.
File Manager lets you browse, upload, edit, and download server files from inside CtrlOps - no separate SCP client or FTP tool needed. When fixing SSH permission issues, you can edit authorized_keys or sshd_config visually without opening a separate app.
Local-first security model: All credentials - SSH keys, server IPs, passwords - stay on your machine only. Nothing syncs to any cloud service. CtrlOps connects to your servers directly over SSH with no cloud bridge in between.
Multi-server fleet: Unlimited server connections. Add each server once with a name you recognize - "prod-backend," "staging-api," "client-acme-db" - and connect with one click. No spreadsheet, no copy-pasted IPs. If you want to see how teams handle this at scale, read the guide on managing multiple servers without losing control.
| What you need | CtrlOps feature | Time with CtrlOps | Time manually |
|---|---|---|---|
| Generate Ed25519 key | SSH Setup Wizard | Under 2 minutes | 5 min + docs lookup |
| Copy key to server | Wizard, one-click copy | Under 2 minutes | 10 min including errors |
| Revoke a departing dev's key | SSH Management tab, Revoke button | 30 seconds per server | 5 min per server |
| Audit all keys on a server | SSH Management tab, visual registry | 2 minutes | 10 min per server |
| Diagnose SSH auth errors | AI Terminal, approval-gated commands | Under 5 minutes | 30 to 60 min on Stack Overflow |
| Fix permissions or config files | File Manager, visual editor | Under 2 minutes | 10 min via terminal |
CtrlOps runs on macOS (Apple Silicon and Intel), Windows, and Linux. It connects to any Linux server with SSH enabled - AWS, DigitalOcean, Hetzner, Vultr, bare metal, any VPS. No agents required on your servers.
Pricing: $7/month per user for the monthly plan. $70/year per user for the annual plan (saves 17%). Both include unlimited server connections and all features. One month free trial, no credit card required. See full pricing details.
The Freelancer Multi-Client SSH Key Scenario
You are a freelance developer managing 10 client servers across different hosting providers. Here is exactly how to structure SSH keys without it becoming a liability.
The problem without a system:
One key for everything means a stolen laptop exposes all 10 clients at once. Keys stored in a Google Drive folder labeled "server stuff" means credentials are cloud-synced by default. No comments on keys means you cannot identify which entry to revoke when a project ends. No audit means you do not know if keys from 18 months ago are still active.
The correct structure:
~/.ssh/
├── client_acme_ed25519           # Client A
├── client_acme_ed25519.pub
├── client_beta_rsa4096           # Client B, legacy server requires RSA
├── client_beta_rsa4096.pub
├── client_gamma_ed25519          # Client C
├── client_gamma_ed25519.pub
└── config
~/.ssh/config for multi-client management:
Host acme-prod
  HostName 203.0.113.10
  User ubuntu
  IdentityFile ~/.ssh/client_acme_ed25519
  AddKeysToAgent yes

Host beta-staging
  HostName 198.51.100.45
  User root
  IdentityFile ~/.ssh/client_beta_rsa4096

Host gamma-backend
  HostName 10.0.0.5
  User ec2-user
  IdentityFile ~/.ssh/client_gamma_ed25519
Now ssh acme-prod connects with the right key automatically. No flags, no remembering which key goes where.
When a project ends: Run ssh-add -d ~/.ssh/client_acme_ed25519 to remove it from the agent, revoke your public key from the client's authorized_keys, and archive or delete the local key pair.
Client NDA compliance: Many clients in finance, healthcare, and enterprise SaaS have contracts that prohibit storing server credentials on cloud services. If you use an SSH tool that syncs to cloud by default, that may be a compliance violation regardless of intent. CtrlOps is local-only - credentials stay on your machine, nothing syncs to any third-party service. That is a straightforward answer to a compliance question.
For a deeper look at managing multiple servers across client environments, read the guide on managing multiple servers without losing control.
If you are specifically looking for a GUI SSH client for Mac that handles per-client key management well, the comparison of best SSH clients for Mac in 2026 covers your options in detail.
You might also find value in exploring how AI is changing server operations more broadly - the AI in DevOps guide covers what these workflows look like for small teams in practice.
SSH Key Audit Checklist
Run this every 90 days, or after any team or project change.
On your local machine:
- List all key pairs:
ls -la ~/.ssh/*.pub - Check agent contents:
ssh-add -l - Verify every key has a meaningful comment
- Confirm
chmod 700 ~/.sshandchmod 600on all private keys - Confirm no private keys are in any cloud-synced folder
- Confirm passphrase on all non-automation keys
- Delete or archive keys for projects that ended more than 90 days ago
On each server:
- View all authorized keys:
cat ~/.ssh/authorized_keys - Count entries:
wc -l ~/.ssh/authorized_keys - Confirm you can identify every entry's owner
- Remove any key without a clear owner
- Verify
chmod 600 ~/.ssh/authorized_keys - Verify
chmod 700 ~/.ssh - Check
PubkeyAuthentication yesin/etc/ssh/sshd_config
After team or project events - do these immediately, not later:
- Developer leaves: revoke their key from all servers the same day
- Laptop stolen or lost: revoke all keys associated with that device immediately
- Project ends: remove your key from the client's servers before the final invoice
- Contractor engagement ends: revoke access before or alongside the final payment
Conclusion
SSH key management is not a one-time setup. It is an ongoing practice - generating the right key type, protecting private keys locally, using passphrases, keeping access per-user, and revoking the moment someone leaves.
The 14 practices in this guide cover the full SSH key lifecycle. Most take under 10 minutes to implement the first time. The audit checklist takes 30 minutes every quarter. The payoff is infrastructure where a stolen laptop, a departed developer, or an ended project does not automatically mean a security incident.
Start with the three highest-impact changes: switch to Ed25519 keys, add passphrases to all developer keys, and put per-user key management in place with a real revocation process. If you want to make that revocation process a 30-second click instead of a 30-minute CLI task, CtrlOps' SSH Management module handles it across every server in your fleet - at $7/month per user with a 1 month free trial and no credit card required.